Bread
This post from 2011 has been updated several times, most recently in January 2021.
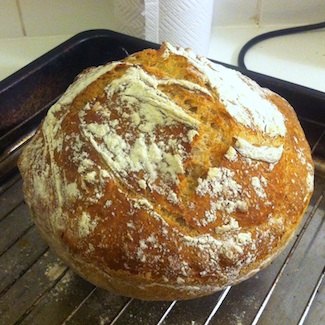
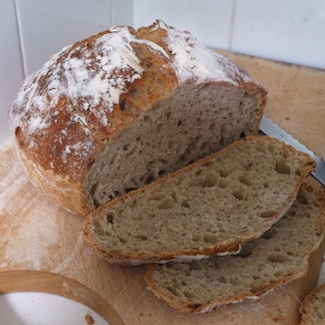
This recipe makes wonderful bread: crusty, open-textured, moist, and good-looking.
It’s based on Jim Lahey’s recipe from the New York Times in 2006 (also the subject of an article and accompanying video, and now a full-length book). But it’s easier than that one: there’s less faffing, and no silly middle stage with linen cloths.
In the ten years since I started using the recipe, I’ve baked most of our family’s bread. As my sister-in-law recently remarked, it makes normal bread recipes look like some weird conspiracy: why would you tell people to make all the effort and mess involved in kneading, when a bit of stirring turns out just as well?

What you need
Ingredients
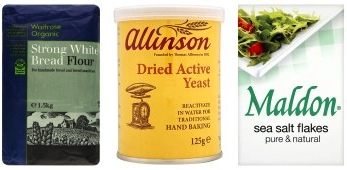
- 450g strong white bread flour
- 340g water (or 340ml, but weighing is usually easier and more accurate)
- One third of a teaspoon dried yeast
- 2 teaspoons (8 – 10g) salt
Equipment
- A lidded cast-iron casserole pot, around 21cm diameter (I’ve been told that a ceramic pot also works, but I haven’t tried this).
- The bread-making usual: scales (preferably electronic, for accuracy), mixing bowl, measuring jug, wooden spoon, wire rack, timer, oven.


If you need any of this equipment, the above pictures link to Amazon. I get a referral fee if you buy something. This has never yet happened.
What you do
There are two short steps, separated by a rising.
Step 1: Mix
Measure 450g of flour into the bowl. Add the salt and yeast, and stir to mix through.
Pour in the water, all at once. Stir until fully mixed to make a slightly sticky dough.
Leave it a couple of minutes, then stir again for a couple of minutes more. This develops the gluten and makes it a bit more elastic. It takes a bit of effort, since it replaces the traditional knead.
Notes:
- To speed things up, best use warm water: one part boiling to three or four parts cold. Too hot and you’ll kill the yeast, though.
- This yeast quantity is less than most bread recipes (and the back of your yeast packet) call for. It’s enough, though you can use more for a slightly faster rise. There’s no need to reactivate it in water first, whatever the packet says. But do make sure it’s not too old: yeast that’s been opened for more than a few months begins to lose its oomph.
Rising
Cover the bowl with a large plate and leave for 8 – 24 hours at room temperature (or somewhere warmer, like an airing cupboard). Usually I mix it in the evening and bake it just in time for breakfast.
Step 2: Bake
The dough should now have roughly doubled in volume.
At this point it’s possible to stir the dough again and leave it to rise a second time. This is the traditional approach, and it may get you a marginally better crumb, but the difference is barely perceptible, so these days I rarely bother.
Put the lidded casserole pot in the oven, and pre-heat the oven and pot to about 210 degrees C.
Carefully take the now-dangerously-hot pot from the oven and remove the lid. Throw a bit of flour in the bottom to help stop the loaf sticking.
Tip and scrape the risen dough into the pot, doing your best not to knock out all the air. Throw a bit more flour over the top for effect.
Replace the lid and return the pot to the oven for 45 minutes. Tip the loaf out and leave it to cool on a wire rack. Admire!
Note:
- A rounded flexible scraper (mine is cut out of the bottom of a plastic take-away carton) is good for smoothly transferring the dough from bowl to pot.
- Some ovens are hotter than others. Some people like a darker crust than others. Experiment.
- If the loaf sticks to the pot, try turning up the oven a bit, and be sure to use plenty of flour or seeds on the bottom. It also helps if the pot is well seasoned, so don’t wash it between loaves. You can scrape off any stuck bits with a wooden spoon.
Variations
Various combinations of flours and seeds make a more interesting loaf. Family favourites are:
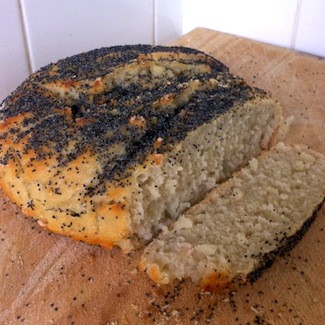
Poppy seed white
Carpet the bottom of the casserole pot with poppy seeds just before you tip the dough in, and carpet the top of the dough with more seeds straight after (no mere sprinklings, please). The seeds stick pretty tight and toast just the right amount during baking.
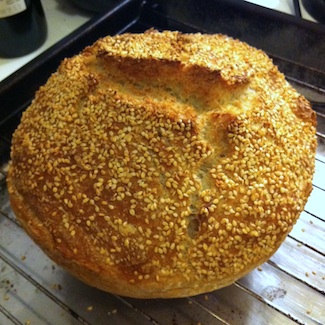
Sesame brown
Carpet the pot-bottom and loaf-top with sesame seeds. Replace 100g of the white flour with wholemeal bread flour. Optionally, replace a further 50g of the white flour with oats.
Caraway and rye
Replace 150g of the wheat flour with rye, and add a heaped teaspoon of caraway seeds to the dry ingredients at step 1. This loaf works especially nicely if dusted with semolina flour just before baking.
Malted granary
Replace half of the plain bread flour with a malted bread flour. You could also throw in some seeds, such as linseeds, sesame seeds, sunflower seeds, and/or pumpkin seeds. This one smells amazing in the oven: it’s one to bake if you’re selling your house).
Fruit loaf (giant hot cross bun)
Reduce the flour to 400g, water to 320g, and salt to 1 teaspoon, and add:
- 100g mixed dried fruit
- 40g sugar
- 1 teaspoon ground cinnamon
- Half teaspoon ground ginger
- Quarter teaspoon ground nutmeg
- 1 – 2 teaspoons malt extract (with the water)
Err on the generous side with the spice quantities. Excellent fresh or toasted.
Gluten-free
For some coeliac friends we’ve made the poppy seed recipe, but replacing all the flour with the Doves Farm gluten-free variety, with surprisingly acceptable results (pictured right). It’s a little bit chewy, but if eaten the same day it’s still tasty, crusty and moist.
Saving money (but maybe not the world)
Organic flour costs about 60p per loaf, ordinary flour around 30p. The electricity or gas should come in under 20p, so you’re looking at well under a pound a loaf either way.
A domestic oven baking one loaf is almost certainly less energy-efficient than a commercial oven baking many, so making your own bread is probably not entirely green. Then again, if your oven is electric you could switch to renewable electricity.
-
Tony
-
Yavuz Onder